By Lauren Holland
Updated November 2026
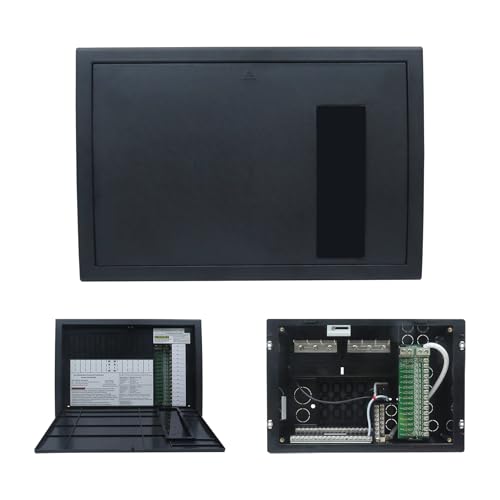
The WFCO 9800 series RV deck mount power converter charger is a 12-volt power supply that converts your RV’s 120-volt shore power into usable DC power for lights, pumps, fans and your house batteries, while also charging those batteries. This guide walks you through what the unit does, how to confirm it fits your rig, how to size and wire it, and how to check that it is charging correctly once it is running. Use it as a planning and checking reference, then confirm all wiring and fuse details against the manual that came with your unit.
What the WFCO 9800 Series Does
A converter-charger like the 9800 series does two jobs at once. When the RV is plugged into shore power, it supplies 12-volt DC to the coach circuits and sends charging current to the house battery bank. When shore power is off, the battery bank carries the load. Understanding this split helps you read the unit’s behavior later: a converter that never charges the batteries, or drops out whenever a large load starts, is usually telling you something specific about its setup.
Shopping for one? See our guide: 6 Best Power Converter Charger RV Models for Campers (2026).
The “deck mount” label refers to how the unit is physically installed, typically on a flat surface or panel inside a compartment, rather than wall-mounted in the living area. Manufacturers generally specify the output amperage, the charging profile and the input voltage range. Those specs, not the model family name alone, determine whether a given 9800-series unit is right for your coach.
Step 1: Confirm Your RV Needs a Converter-Charger of This Type
Before buying or installing anything, check what your coach already has. Look at the existing power center, usually labeled with a converter output rating and a battery bank description. If you have a 12-volt distribution panel with fuses for lights, water pump and fans, you already have a 12-volt system that needs a converter.
Ask yourself these questions:
- Is shore power your main source of 12-volt power when parked at a campground?
- Does your house battery bank need regular charging from shore power?
- Do you run a lithium battery bank? Lithium batteries typically require a charging profile that matches their chemistry, so confirm compatibility in the converter’s documentation.
- What is your shore power service rating? Most RV plugs are 30-amp or 50-amp, and this affects how much current the whole system can draw.
Step 2: Size the Output Against Your Real 12-Volt Load
Converter output is measured in amps at 12 volts. A useful way to size it is to add up the continuous 12-volt draw of everything you expect to run at the same time, then compare that to the converter’s rated output. Leave some margin, because a converter running at its ceiling for hours is working hard and running warm.
| Typical 12V load | Approximate draw (amps at 12V) | Notes |
|---|---|---|
| LED lighting (whole coach) | 2 to 6 | Depends on fixture count and brightness |
| Water pump | 5 to 10 | Runs intermittently |
| 12V roof or exhaust fan | 1 to 3 | Varies by speed setting |
| 12V compressor fridge | 3 to 5 average | Cycles on and off |
| Battery charging current | Varies | Highest draw when batteries are deeply discharged |
These figures are typical ranges, not specifications for any particular appliance. Check the label on each device or its manual to get exact numbers for your rig.
Step 3: Prepare the Mounting Location and Tools
A deck mount unit needs a stable, dry, ventilated spot with room for the wiring and air to move around the heat sink. Converters produce heat, so avoid enclosing the unit in a tight compartment without airflow.
Gather these before you start:
- Manufacturer’s manual and wiring diagram for your specific 9800-series model
- Digital multimeter for checking voltage at each stage
- Correctly rated wire and crimp connectors, sized to the manufacturer’s recommendations
- Fuses or breakers matching the specified ratings
- Mounting hardware and a drill for the deck surface
- Insulated screwdrivers and a torque tool if the terminals call for a specific torque value
Disconnect shore power and turn off the battery disconnect before touching any wiring. Working on live 120-volt or battery circuits is a real shock and fire risk. If you are not comfortable with this work, have a qualified RV technician handle the installation.
Step 4: Wire the Unit According to the Manual
Wiring is where most installation problems start. Follow the manufacturer’s diagram exactly, and pay attention to:
- Battery polarity. Reversed battery leads can damage the unit and the batteries.
- Wire gauge. Undersized battery cables cause voltage drop, so the converter may charge poorly even when it is working properly.
- Ground connections. Use the grounding points called out in the manual and keep them clean and tight.
- Fuse placement. Install the specified fuse close to the battery connection, as the manual directs.
After wiring, double-check every connection against the diagram before reconnecting power.
Step 5: Verify Output and Charging Behavior
With the batteries connected and shore power on, use your multimeter to check the output voltage at the 12-volt distribution panel and at the battery terminals. The exact target voltage depends on the charging stage and battery type, so compare your readings to the charging profile in the manual rather than a single number.
Look for these signs of normal operation:
- The unit powers up and the status indicator shows the expected mode.
- Coach 12-volt circuits work with shore power connected.
- Battery voltage rises over time while plugged in, then settles into a maintenance stage.
- The unit does not overheat or emit a burnt smell.
If the readings are far from the manual’s guidance, unplug shore power and recheck the wiring before doing anything else. For fault-finding ideas, see the article Troubleshooting RV Power Converter: A Step-by-Step Guide for Campers.
Common Mistakes to Avoid
- Undersizing the battery cable. Thin cable causes voltage drop and makes the converter appear weak.
- Mounting in a sealed compartment. Heat builds up quickly and shortens component life.
- Skipping the fuse or using a larger fuse. The fuse protects the wiring; an oversized fuse defeats that protection.
- Assuming the converter charges lithium the same way as lead-acid. Confirm the charging profile before connecting a lithium bank.
- Ignoring shore power limits. Running heavy 120-volt loads alongside battery charging can trip the campground pedestal breaker.
Tips for Long-Term Reliability
- Inspect terminals every few months for corrosion and tighten them as needed.
- Keep the area around the unit clear of dust, insects and stored items that block airflow.
- Test battery voltage with the unit both connected and disconnected from shore power, so you know how it behaves.
- If you are comparing options, look at the broader range of models in 6 Best RV Power Converter Battery Charger Picks for Campers (2026) and Power Converters for Rv (2026): Which Should You Choose?.
- For lithium systems, review 6 Best RV Power Converters for Lithium Batteries Compared (2026).
Recommended gear
A quality digital multimeter is the most useful tool for checking the installation. It lets you verify output voltage and battery voltage without guessing. View on Amazon
Properly rated battery cable and crimp terminals reduce voltage drop, which is one of the most common reasons a converter charges poorly. View on Amazon
A fuse holder and fuse kit matched to the manufacturer’s rating keeps the protective device installed correctly. View on Amazon
FAQ
Can I install a WFCO 9800 series unit myself?
Some RV owners do the work themselves, but the unit involves 120-volt shore power and battery connections. If you are not experienced with electrical work, have a qualified RV technician install it. Always follow the manufacturer’s manual.
Does the converter charge lithium batteries?
It depends on the model and the charging profile it uses. Check the unit’s documentation for lithium compatibility before connecting a lithium bank, and confirm the battery manufacturer’s charging requirements too.
Why does my battery not charge even though the converter is on?
Common causes include undersized or loose battery cables, a blown fuse, a faulty battery disconnect, or batteries that are already at full charge. Measure voltage at the converter and at the battery to find where the drop occurs.
Can I run the air conditioner and charge the batteries at the same time?
Often you can, but it depends on your shore power service rating and the converter’s output. Heavy 120-volt loads plus battery charging can trip the campground breaker, so reduce loads if you see tripping.
How hot does the converter get?
Converters produce heat during charging, and the surface may feel warm. Excessive heat, a burning smell or discolored wiring are signs to shut the unit down and investigate.
What is the difference between a converter and an inverter?
A converter changes 120-volt AC shore power into 12-volt DC power. An inverter does the opposite, turning 12-volt battery power into 120-volt AC. The WFCO 9800 series is a converter-charger, not an inverter.
How do I know if the unit is failing?
Signs include output voltage that drifts well outside the manual’s range, batteries that never reach full charge, intermittent 12-volt power, or unusual noises and heat. Test before replacing anything, and see RV Power Converter Not Working: 6 Steps to Diagnose and Fix It for a diagnostic sequence.
Conclusion
The WFCO 9800 series RV deck mount power converter charger is a central part of an RV’s 12-volt system, handling both coach power and battery charging when you are plugged into shore power. Matching the output to your real load, wiring it exactly as the manual shows, and verifying voltage and charging behavior will get you reliable performance. When in doubt about the electrical work, bring in a qualified technician.
Related reading
- Top 5 55 Amp Power Converters for RV Options Compared (2026)
- Rv Power Converter Replacement Kit: 7 Steps to Swap Your Converter Safely (2026)
Ready to choose one?
About Lauren Holland
Lauren Holland is part of our editorial team and reviews and edits our off-grid power for camping, RV & vanlife guides, checking product details against manufacturer specifications and owner feedback.