By Isabella Bennett
Updated November 2026
A 30 amp RV power cable carries up to 3,600 watts (120 volts at 30 amps) from a campground pedestal or household outlet into your rig. This guide explains how to pick the right 30 amp RV power cable, inspect it before you plug in, connect it in the correct order, and recognize the warning signs that mean it is time to stop. By the end, you will know how to power your rig safely and how to match your cable to the power your campsite actually offers.
What a 30 Amp RV Power Cable Actually Does
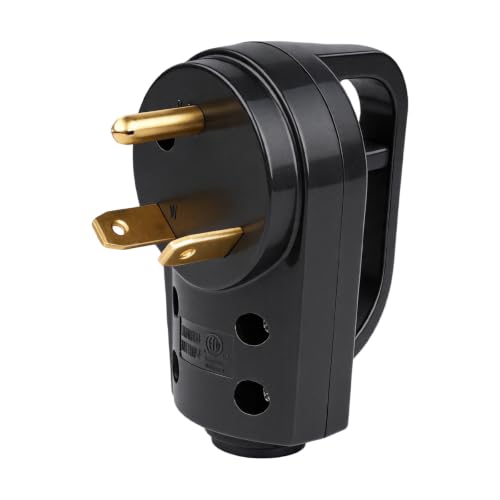
A 30 amp cable is a heavy-duty extension between a 30 amp campground receptacle and your RV’s power inlet. The plug on the campground end is a three-prong twist-lock (TT-30 is the standard for RV pedestals). The end that plugs into your rig is a round, three-pin inlet connector. Inside the cable are a hot conductor, a neutral conductor and a ground conductor, usually in 10 AWG wire for a 30 amp rating.
Shopping for one? See our guide: 8 Best 12V Fridges for RV Options for Every Camping Setup (2026).
That wire gauge matters. Thinner wire heats up under load, and a 30 amp cable run over long distances can lose enough voltage to affect air conditioners and compressors. For most campers, a properly rated cable of 25 to 50 feet is the practical range.
Step 1: Figure Out Your Power Needs First
Before buying or using a 30 amp cable, estimate how much power your rig draws. A 30 amp service is 3,600 watts at 120 volts. Most RVs with a rooftop air conditioner, a microwave and an electric water heater can exceed that if everything runs at once.
- List the major loads: rooftop AC (often 1,200 to 1,800 watts running), microwave (around 1,000 to 1,500 watts), electric water heater (about 1,500 watts), and the converter that charges your house batteries.
- Add the running load of your common appliances and divide by 120 to get an approximate amperage.
- Stagger heavy loads. Don’t run the AC, microwave and water heater at the same time on a 30 amp service.
If your estimate comes close to 30 amps, a 50 amp connection will give you more headroom, but a 30 amp cable is still the correct tool for a 30 amp pedestal.
Step 2: Choose the Right Length and Gauge
Length is a trade-off. Longer cables reach more campsites but lose more voltage. Shorter cables run cooler and deliver steadier power. Use the shortest cable that reaches your pedestal without strain.
| Cable Length | Typical Use | Voltage Drop Concern |
|---|---|---|
| 25 feet | Standard campsite, short run | Minimal |
| 30 to 35 feet | Most campsites | Low at normal loads |
| 40 to 50 feet | Long pulls to the pedestal | Noticeable with AC running |
Look for a cable labeled 10 AWG and rated for 30 amps. Cables with a thicker jacket and a sealed, rubber-style plug end tend to hold up better to sun, cold and repeated coiling.
Step 3: Inspect the Cable Before Every Connection
Most RV electrical failures start with a cable or plug that looked fine until it was under load. A quick visual and physical check takes under a minute.
- Check the outer jacket for cuts, flattened spots, cracks or exposed wire.
- Look at both plug ends for scorched or discolored prongs, melted plastic or loose housings.
- Confirm the plug blades are straight and the ground pin is intact.
- Feel the plug after a few minutes of use. Warmth can be normal under heavy load, but hot to the touch is not.
- Check the cable for kinks or stiffness that suggests internal damage.
Replace any cable with melted or burned parts, even if it still works.
Step 4: Connect the Cable in the Correct Order
Connection order reduces arcing and protects your rig’s electronics.
- Turn off all major appliances in the RV, including the AC, water heater and microwave.
- Make sure the campground pedestal breaker is off or the receptacle cover is closed before you handle the plug.
- Plug the RV end of the cable into the inlet on your rig first, twisting until it seats fully.
- Then plug the campground end into the pedestal receptacle, aligning the prongs and twisting clockwise until it locks.
- Turn the pedestal breaker on, then switch on your RV’s main breaker or shore power switch.
- Check your surge protector or power monitor for a normal reading before turning on appliances one at a time.
When disconnecting, reverse the order: turn off the RV main, then the pedestal breaker, then remove the cable from the pedestal and from the rig.
Step 5: Protect the Connection From Power Problems
Campground power can be unstable. Low voltage, reversed polarity and open ground are common problems, and a 30 amp cable does nothing to protect against them. A dedicated monitor or surge protector does. Many campers pair their cable with a hardwired or plug-in surge protector rated for 30 amps. For details on choosing one, see RV Power Surge Protector 30 Amp: How to Choose and Install One (2026) and RV Power Surge Protectors: How to Choose and Install One (2026).
If you camp with a rig that has a hardwired surge protector, your 30 amp cable still needs to be inspected, but the protector will handle many of the voltage issues you can’t see from the outside.
Tools and Supplies to Keep With Your Cable
- A voltage and polarity tester that plugs into the pedestal receptacle
- A dielectric grease or electrical contact cleaner for plug ends
- A cable wrap or hose-style organizer to prevent jacket damage
- A spare 30 amp to 15 amp adapter for emergencies (use only if your load is light)
Recommended gear
A pedestal tester gives you a quick read on polarity, ground and voltage before you commit a rig’s electronics to the power.
Use a voltage monitor with an alarm to catch low or high voltage while you are connected.
A cable organizer or wrap keeps the jacket from kinking and cracking during storage and transport.
Dielectric grease helps protect plug contacts from moisture and corrosion, especially in humid or coastal campgrounds.
Common Mistakes
- Using a damaged cable because it still powers the rig. Heat damage inside a cable can progress until it fails under load.
- Plugging in the campground end first. This leaves the live plug exposed while you work at the rig inlet.
- Running every appliance at once. A 30 amp service has a fixed ceiling, and overloading trips the breaker or stresses the cable.
- Dragging the cable over rocks or under tires. Jacket damage is the most common cause of premature failure.
- Ignoring voltage drop on long runs. If your AC struggles, a shorter cable or a closer site may solve it.
- Skipping a polarity check. Reversed hot and neutral can damage electronics even when lights seem to work.
Tips for Longer Cable Life
- Coil the cable loosely in a figure-eight pattern rather than tight loops, which kink the conductors.
- Store it out of direct sun and away from fuel, oil and solvents.
- Keep the RV plug end covered when not in use to keep dirt and moisture out.
- Replace the cable on a schedule if you camp often, rather than waiting for visible wear.
FAQ
Can I use a 30 amp RV power cable with a 15 amp outlet?
Only with a proper adapter, and only for light loads. A 15 amp outlet can carry about 1,800 watts on a continuous basis at most. Running an air conditioner or water heater from it can overheat the circuit.
How long can a 30 amp RV power cable be?
Many cables come in 25, 30, 35, 50 and 100 foot lengths. Longer cables lose more voltage, so most campers keep runs under 50 feet when possible.
Is a 30 amp cable the same as a 30 amp plug?
No. The cable is the full assembly. The plug is one of its two ends. A 30 amp cable typically has a TT-30 plug on the campground end and a 30 amp RV inlet connector on the rig end.
Can I repair a damaged 30 amp RV power cable?
Plug ends can sometimes be replaced, but cable jacket and conductor damage is usually not worth repairing. A licensed electrician can advise on repairs if you are unsure. Replacement is usually the safer choice.
Why does my AC stop when I plug into a 30 amp pedestal?
The most common causes are an overloaded circuit, a low-voltage pedestal, or a long cable with voltage drop. Turn off other appliances first, then check the pedestal voltage with a tester.
Does a surge protector replace a good cable?
No. A surge protector guards against voltage problems, but it cannot fix a damaged cable. Use both.
How often should I replace a 30 amp RV power cable?
There is no fixed interval. Replace it when the jacket is cracked, the plugs show heat damage, or the cable feels stiff or hot under normal use. Frequent campers often replace cables every few years as a precaution.
Should I consult a professional about RV electrical work?
Yes, if you notice repeated breaker trips, burning smells, discolored outlets or buzzing at the pedestal. Ask a licensed RV technician or electrician to inspect the system.
Conclusion
A 30 amp RV power cable is simple in concept but demands respect in use. Choose a cable with the right gauge and length, inspect it before each connection, and follow the correct plug-in order. Pair it with a monitor or surge protector and keep your loads within the 3,600 watt ceiling, and your rig will run safely through most campground hookups.
Related reading
- Using a Portable Power Station in an RV or Camper Van
- RV Solar Power Basics: Panels, Controllers and Batteries
- USB-C Power Banks for Camping: PD Wattage and Cables
- 12V Fridge Power Consumption: How Many Amps It Really Draws
- When You Need a Large Power Station for Camping
- Using Camping Power Gear During a Blackout
Ready to choose one?

About Isabella Bennett
Isabella covers off-grid power for camping, rv & vanlife, comparing specs, features and long-term owner feedback to help readers choose with confidence.